Friday, September 3, 2010

MuseScore Tutorial, Part 2

MuseScore 0.9.6 on Ubuntu 10.04 LTS
Note: This article is the third in a series of articles on MuseScore. Articles one and two originally appeared on Examiner.com.

Last time, we explored MuseScore by starting a simple arrangement of Pachelbel's canon for Guitar Ensemble and 'Cello. This week, we'll finish entering the parts, add editorial markings and articulations, fix any stylistic issues and make parts for our ensemble members. We'll also add a few editorial notations.

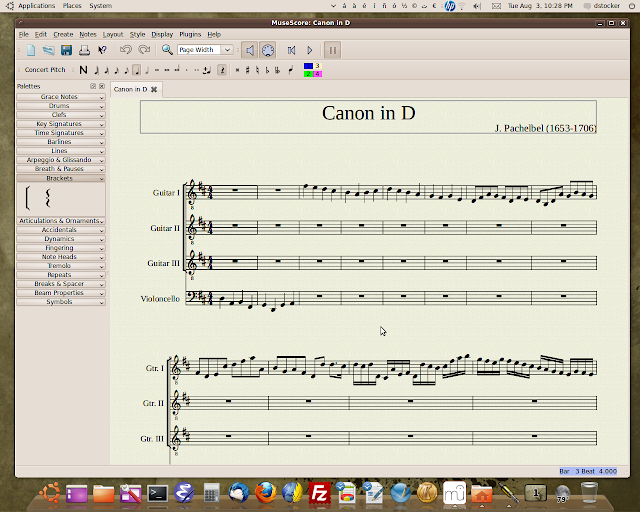
Since Pachelbel's Canon is a canon, each of the parts is essentially the same. To fill in the remaining two parts, we'll just copy the first part and paste it in the staves for parts two and three. Click inside the Guitar I part at measure three, where the part comes in. A blue box appears around the measure and the notes light up blue, indicating that the measure has been selected. We need to select the whole part, so without clicking anywhere else on the score, let's navigate to the last page of the score using the navigator at the bottom of the window (press the F12 key if the navigator is not already visible). Click inside the navigator window and drag the score to the left to move the last page into view.

In most familiar programs, the way to select a range is to click at the beginning of the range, and then press and hold the Shift key and click at the end of the range. MuseScore works that way too. So now that we have the last page in view, Shift+click the third to last measure of the Guitar I part (in Pachelbel's Canon, the entrance of the parts is offset by two bars, so that each successive part is contains two fewer bars of music). Now you'll see the whole range enclosed in the blue box, indicating that it's selected.
Copy the selection to the clipboard by choosing “Copy” from the “Edit” menu, or by pressing Ctrl.+C. Now, use the navigator window to slide the first page back into view. Click on measure 5 of the Guitar II part. The measure is now selected. Press Ctrl.+V or select “Paste” from the “Edit” menu and watch the notes appear.
Similarly, copy the notes from Guitar II (minus the last two measures) and paste them into the Guitar III part.
Now you have almost the entire Canon notated. All we have left is to fill in the last measure of the Guitar parts and copy the 'Cello part to fill in the entire piece.
Every score writer uses defaults that will need to be tweaked before printing a final product. Sometimes it's a matter of taste, and other times it's to fix elements that clash with existing engraving standards. Let's spend a little time cleaning up for style. And while we're at it, we can add some editorial notations (but not so many as to clutter the page).

The very first thing I notice that needs fixing is the placement of measure numbers at the start of each system. Remember in part one when we added a bracket to the guitar section? Well now the wing of that bracket is colliding with the measure numbers, so let's fix it.
Zoom in to enlarge your view of the small section you'll be working with: Select a larger magnification percentage from the drop down menu on the main toolbar. Then use the navigator to drag the score around until a measure number visible. Right-click the measure number to display a context menu, and then click “Text Properties...”—the last option on the menu. The “Text Properties” dialog appears. Under “Offset,” select the “Space” radio button to change the unit of measure to spaces. The horizontal (X) placement is fine so we'll only change the vertical (Y) position. We need to move the number up by about 1 space, so we'll enter a value of -2.00 spaces (negative two point oh). Click the checkbox at the bottom that says “apply to all elements of same type” so that this change affects all measure numbers currently in the score (what a handy and intuitive feature!).
Click “OK” to apply the changes and exit the dialog. Now, see that the numbers have been moved up one space and are no longer colliding with the wing of the section bracket. Very nice.
The next thing I see is that MuseScore puts the stems on some beamed groups in the wrong direction. This is a bug and the MuseScore team is aware of it. In the meantime, it's easy to fix. Select the notehead of the first note in a beamed group.
To flip the stems of the beamed group, simply press the “X” key on your keyboard. Repeat this procedure for every group that needs to be fixed.
Whenever music contains passages with more than one solution, I always liked to give my intermediate learners some helpful hints that may not be obvious from just reading the notes. Pachelbel's Canon is a great piece for intermediate ensemble members transitioning to more advanced material, and so there are several passages where the student will benefit from some fingering suggestions, so let's add a few to the score. Since the key of D Major falls easily on the fretboard in the second position, let's notate that on the first note of the canon. Select the first note of Guitar I by clicking it, and choose “Text=>Staff Text” from the “Create” menu. If you like menu shortcuts, then just press “Ctrl.+T” with the note highlighted. A blue box appears above the note, ready to display any text you care to type.
The indication for second position in guitar music is the Roman numeral “II” so we'll type “II.”
Just to reinforce the direction, we'll add an indication for the first finger to the first note as well. On the “Palettes” pane, expand the “Fingering” section. Drag the “1” from the palette onto the first note (the note will light up red when it's ready to accept the score element, at which point, release the mouse button). Now, there's a number “1” attached to the first note.
Initially, the fingering is centered on the stem of note and colliding with the left side of the notehead. Because tastes and situations vary with regard fingering placement, MuseScore expects you to position the fingering indication wherever it makes the most sense to you. You can achieve this by simply dragging the fingering to where you want it to display.
Keep adding fingerings to the tricky passages, but don't add so many that your students will be overwhelmed.
Now that all of the music is the way we want, let's make some minor adjustments to the layout. In several spots, MuseScore uses a whole line for just one measure of primarily thirty-second notes. These areas can reasonably fit two measures per line. To adjust this, select two consecutive measures that are taking up one line each.
To condense the two lines into one line with two measures, choose “Add Less Stretch” from the “Layout” menu or press the “{“ key.
Continue adjusting the layout until it's the way you want it. When you're finished, you should have a completed score with editorial markings where necessary. Now it's time to make parts for our instrumentalists.

On the “File” menu, select “Parts...” The Parts Dialog appears.
Under “Edit Part,” edit the File Name and Part Title to suit your tastes. Next, check the box under “Instrument” which corresponds to the instrument you're making a part for. Instruments are shown in order according to their vertical placement in the score. When you're done, click “Create Part” in the lower left of the dialog. In MuseScore's main window, notice there is now a new tab which corresponds to the file name you just entered. To make a new part, click the “New” button and enter the names for your new part. Continue making parts until you're done.

Now, you have a set of parts complete with the fingerings and other markings you entered in the score. Some of the elements may need to be repositioned before your parts are finalized. The first thing I noticed is that MuseScore didn't automatically make multi-measure rests out of sections with two or more consecutive empty bars. This is easy to fix. Click the tab of the part you're working on. On the “Style” menu, select “Edit General Style...” The Edit Style Dialog appears.
With “Score” highlighted in the left pane, click the box for “Create multi measure rests.” The default settings should be fine, so click the “Apply” button. Click “OK” to return to the score. Any consecutive blank measures have now been condensed into a multi-measure rest. Repeat the procedure for each part that will need multi-measure rests.

That will conclude our project with MuseScore. To download copies of this arrangement of “Canon in D,” use the links below. I've provided *.pdf files for immediate printing, and MuseScore files that you may alter to suit your own needs.

Click the link for pdf to download *.pdf copies of the “Canon in D” score and parts.
Click the link for mscz to download editable *.mscz files.
Click the link for both if you'd like to download both sets of files.

MuseScore Tutorial, Part 1

MuseScore 0.9.6 on Ubuntu 10.04 LTS
Note: This article is the second in a series of articles on MuseScore. It originally appeared on Examiner.com.
 
Last week we took an introductory look at MuseScore, an open source score writer. This week, we're digging in with a closer look at it's basic features and dialogs. For this project, we're scoring Pachelbel's “Canon in D” for Guitar Ensemble and 'Cello. As you progress through the tutorial, click on the illustrations for a full-size view in a new tab or window.

To begin your score, launch MuseScore in whichever way is easiest for you. The “Promenade” from Moussorgsky's famous Pictures at an Exhibition suite appears. Click the “X” in the tab above the score to close it, and then click the “Create new score” icon on the top toolbar, all the way to the left (or, type Ctrl+N, or choose “New...” from the “File” menu). The “Create New Score” dialog appears. Fill in the text fields with the relevant information. Make sure the “Create new score from scratch” radio button is selected and then click “Next.”
Now, enter the instruments for your new score. Select an instrument from the left pane and click the “Add” button. Alternately, you can double-click on the instrument name in the left pane to add it to your score. If you need to change the order of the instruments, highlight the instrument you want to move in the right pane and use the “Up” or “Down” button to adjust its position. If you add a wrong instrument by mistake, highlight it in the right pane and click the “Remove” button. When you're finished adding instruments, click “Next.”
In the next dialog, choose the starting key for your score, and then click “Next.” In the final dialog, choose your values for the starting time signature and enter the number of measures for your score. I've started with 50 measures. Don't worry if you don't know how many measures your score is—you can add or subtract bars later if you need to. When you're done, click “Finish.” A new, empty music sheet appears with the instruments and title info you just provided.

Now we're going to play with MuseScore's default page and layout dimensions, so go to the “Layout” menu and choose “Page Settings...” MuseScore sets up new scores on the A4 paper size. Here in the States, we use Letter size for everyday documents so I chose “Letter” from the drop down menu in the upper left-hand corner of the dialog. Also, go ahead an untick the “Two sided” checkbox beneath the page dimensions fields. (These defaults can be changed for future documents by going to the "Edit" menu, choosing "Preferences..." and then clicking on the "Score" tab.) Under “Scaling,” notice the value for “Space.” This value sets the size for staff spaces (the space between staff lines). In Music Engraving, the staff space is used as a unit of measure for adjusting the size and placement of score elements. 1.764 mm yields a staff height of almost 9 mm, which is a little large for standard parts, so go ahead and enter a value of 1.4 mm for a staff height of 7 mm (which is about standard size for parts). Note: even thought we're typesetting a conductor's score, we're initially using a staff size for standard parts. You'll see why in part two of this tutorial.
I also adjusted the margins by choosing “inch” for my measurement unit, and then changing the margins to 0.5 inches for left and right margins and 0.75 inches for top and bottom under the “Odd page margins” section. Click “Apply” to apply the changes and then “OK” to return to your score.
Before we begin entering notes in our new score, let's bracket the guitars together so that they appear as a section. If the Palette isn't already displayed, choose “Palette” from the “Display” menu, or press the “F9” key. From the Palette, click on “Brackets” (about halfway down) to expand the Brackets area of the palette.
Drag the bracket from the palette onto any measure in the top-most Guitar part. A bracket will appear to the left of the top guitar staff on each system. Now, double-click the bracket. It lights up blue and a handle appears at the bottom. Use the handle to drag the bottom of the bracket down past the bottom of the third Guitar staff. If you drag it too far, don't worry. MuseScore will automatically adjust the bracket to display correctly once the screen is refreshed. Let's also fix the instrument names and short names. Double-click the word “Guitar” to the left of the top guitar staff and edit it so that it says “Guitar I.” Then, fix Guitar II and Guitar III as well. For the short names, we'll useGtr. I,” “Gtr. II” and “Gtr. III” for the Guitars and “Vc.” for the 'Cello.
Now we're ready to start entering the notes. In MuseScore, there are two ways to enter notes. The “point-and-click” method uses the mouse, similar to other score writing programs. To begin, Click on the large “N” above the score (or, press the “N” key on your computer keyboard). Then, select the note value from the available choices along the top. Using the mouse, move the pointer over one of the staves. MuseScore helpfully highlights the pitch of the note you're about to enter. Click the left mouse button and a note appears in the score. If you make a mistake, just press the “Backspace” key. Continue until you've entered the first two bars of the 'Cello part.
Pointing and clicking is rather slow and can quickly become boring. Fortunately, MuseScore can also enter notes with a MIDI keyboard (a music engraver's best friend). So make sure your keyboard is hooked up to your computer and that all your gear is set up properly. In the MuseScore window, make sure the “Enable MIDI Input” (along the top) button is engaged. Click somewhere inside the beginning of the measure you're going to start entering notes in. A blue box appears around the measure. Now, press the “N” key on your computer keyboard to activate “Note input mode,” and see the blue carat which denotes the point of entry. Choose the appropriate rhythmic value on the toolbar along the top, either by clicking with the mouse or by using the number keys on your computer keyboard—4 for eighth-notes, 5 for quarter-notes, 6 for half-notes, and so on. The numeric keypad will work as well. Once you've selected a rhythmic value, you can enter notes by playing them on your MIDI instrument. Start entering the notes for the Guitar I part.
To change note values, simply use the numeric keypad on your computer keyboard. Keep playing until all of the Guitar I notes are entered (or until you get tired, in which case, take a stretch break).
Close to the end, you'll notice that you're running out of measures, even though you have music left to enter. To add measures, click on the “Create” menu and choose “Measures>Append Measures...” In the “Number of measures to append” field, enter the number of bars you need to add. Then, you can continue to input notes until you've finished entering Guitar I.
By this point in the tutorial, you should have the first 2 bars of the 'Cello part, and the whole of Guitar I entered into your score. This is an opportune time to take a breather, so this will be the conclusion of part one of this tutorial. Part two will cover copying and pasting, making manual corrections, dynamics and articulations, and making parts. Cheers!

Introduction to MuseScore for Musicians and Music Educators

Note: This article is the first in a series of articles on MuseScore. It originally appeared on Examiner.com

In the computing age, the ability of musicians and music educators to craft their own scores with the aid of a score writer is a must-have skill. Teachers make exercises that are custom-tailored to their student ensembles' needs. Band leaders need to fill in their arrangements with parts for their individual band members. And of course, studio arrangers must be able to quickly make scores for session musicians and ensembles to read from.

Professional grade score writers are not cheap. An entry level license for Finale® costs $449.00US (from discount retailers—MSRP is $600.00!) unless you're a teacher, student or church musician. Sibelius pricing is similar. There are other “levels” of these products available for less, but they come with less functionality. And there are cheaper alternatives, but Sibelius and Finale represent the gold standard for scoring programs. But lately, open-source developers who happen to love music are catching up to the rest of the open-source pack, developing great software that's immediately useful “out of the box.” Meet MuseScore.

Originally part of MusE (a GNU/Linux only music sequencing program), The MuseScore team has been developing it independently since it was cut out of MusE in 2004. MuseScore is now a standalone, WYSIWYG score writer available for Windows and Mac OS X, in addition to Linux. Recent releases of MuseScore have garnered very positive feedback, and the program is now comprehensive enough to meet the demands of some schools and institutions of higher learning. With the release of version 0.9.5 in 2009, its download stats exploded and are currently holding steady at well over 30,000 individual downloads per month (with nearly 42,000 for June 2010). The current stable release, 0.9.6.1 boasts a faster, more stable user interface than its predecessors. In addition, the artwork (splash screen, icons, user interface elements) is undergoing a major revision and some of those improvements are visible in the new release.

MuseScore contains loads of professional features common to top-rated scoring programs, and even a few that the front-runners don't have. For example, users of other scoring software will find the “Create New Score” wizard intuitive and familiar. Users can choose between point-and-click note entry and MIDI step-time input. Scores can contain an unlimited number of staves and display and print in concert pitch or orchestral transpositions. And, impressively, you can change the color of virtually any score element. That's great for elementary school music teachers. MuseScore can import MIDI and MusicXML for converting scores written in other programs. It can also generate MIDI output, and export to a range of formats including MusicXML, PDF, various graphic formats including SVG, and audio formats like WAV. MuseScore can also export scores to LilyPond, a very mature text-based program that produces excellent results.

Typography nuts will be thrilled with that last export option, but there's plenty of reason to like MuseScore's default output. For starters, MuseScore uses LilyPond's Feta Font for scoring elements. It's a softer typeface which aims to mimic the look of hand-engraved music of the past. This, by itself, strongly differentiates MuseScore from its commercial competitors. Also, its spacing is generally as good as other score writers, although it doesn't rival some of LilyPond's finer nuances. But if the default isn't up to spec, then it can be easily modified in most cases. The placement of most elements can be fine-tuned using the mouse, and score layout can be optimized by adding line breaks and adjustments to the staff spacing. And of course, the size and placement of text can be customized.

Although MuseScore's capabilities are more than adequate for most users in an education setting (and even surpass some commercial programs for many uses), there are some areas where it doesn't yet measure up against the major competitors. One feature that's not quite ready for regular use is the ability to print single parts from a score. MuseScore can do it, but the extracted parts require heavy formatting after the fact (which is to say, they require even more formatting than Finale's extracted parts). This lack can be a strike against MuseScore's viability in a professional environment, so naturally, the developers are working on it. Support for Guitar Tablature is almost completely absent (you can select a “TAB” clef from the “Clefs” pallette, but that's about it). However, Guitar/TAB being such a popular notation format, the developers are taking up that issue as well. But while MuseScore has some ground to cover to catch up to the top dogs, it's clear that it's made substantial and impressive progress over the last 18 months of development. With the release of version 0.9.6.1, it's clearly ready for deployment in music education departments far and wide.

MuseScore is available for Windows, GNU/Linux and Mac OS X and can be downloaded from the MuseScore website.

Next week, we'll dive into MuseScore with a practical tutorial on its basic features. We'll be typesetting a Guitar Ensemble arrangement of Pachelbel's “Canon in D.” Stay tuned.


Thursday, September 2, 2010

Lorem Ipsum

Lorem ipsum dolor sit amet, consectetur adipisicing elit, sed do eiusmod tempor incididunt ut labore et dolore magna aliqua. Ut enim ad minim veniam, quis nostrud exercitation ullamco laboris nisi ut aliquip ex ea commodo consequat. Duis aute irure dolor in reprehenderit in voluptate velit esse cillum dolore eu fugiat nulla pariatur. Excepteur sint occaecat cupidatat non proident, sunt in culpa qui officia deserunt mollit anim id est laborum.